 |
Since December 2019, Amazon Virtual Private Cloud (VPC) has allowed you to route all ingress traffic (also known as north – south traffic) to a specific network interface. You might use this capability for a number of reasons. For example, to inspect incoming traffic using an intrusion detection system (IDS) appliance or to route ingress traffic to a firewall.
Since we launched this feature, many of you asked us to provide a similar capability to analyze traffic flowing from one subnet to another inside your VPC, also known as east – west traffic. Until today, it was not possible because a route in a routing table cannot be more specific than the default local route (check the VPC documentation for more details). In plain English, it means that no route can have a destination using a smaller CIDR range than the default local route (which is the CIDR range of the whole VPC). For example, when the VPC range is 10.0.0/16 and a subnet has 10.0.1.0/24, a route to 10.0.1.0/24 is more specific than a route to 10.0.0/16.
Routing tables no longer have this restriction. Routes in a routing table can have routes more specific than the default local route. You can use such more specific route to send all traffic to a dedicated appliance or service to inspect, analyze, or filter all traffic flowing between two subnets (east-west traffic). The route target can be the network interface (ENI) attached to an appliance you built or you acquired, an AWS Gateway Load Balancer (GWLB) endpoint to distribute traffic to multiple appliances for performance or high availability reasons, an AWS Network Firewall, or a NAT gateway. It also allows to insert an appliance between a subnet and an AWS Transit Gateway.
It is possible to chain appliances to have more than one type of analysis in between source and destination subnets. For examples, you might want first to filter traffic using a firewall (AWS managed or a third-party firewall appliance), second send the traffic to an intrusion detection and prevention systems, and finally, perform deep packet inspection. You can access virtual appliances from our AWS Partner Network and AWS Marketplace.
When you chain appliances, each appliance and each endpoint have to be in separate subnets.
Let’s get our hands dirty and try this new capability.
How It Works
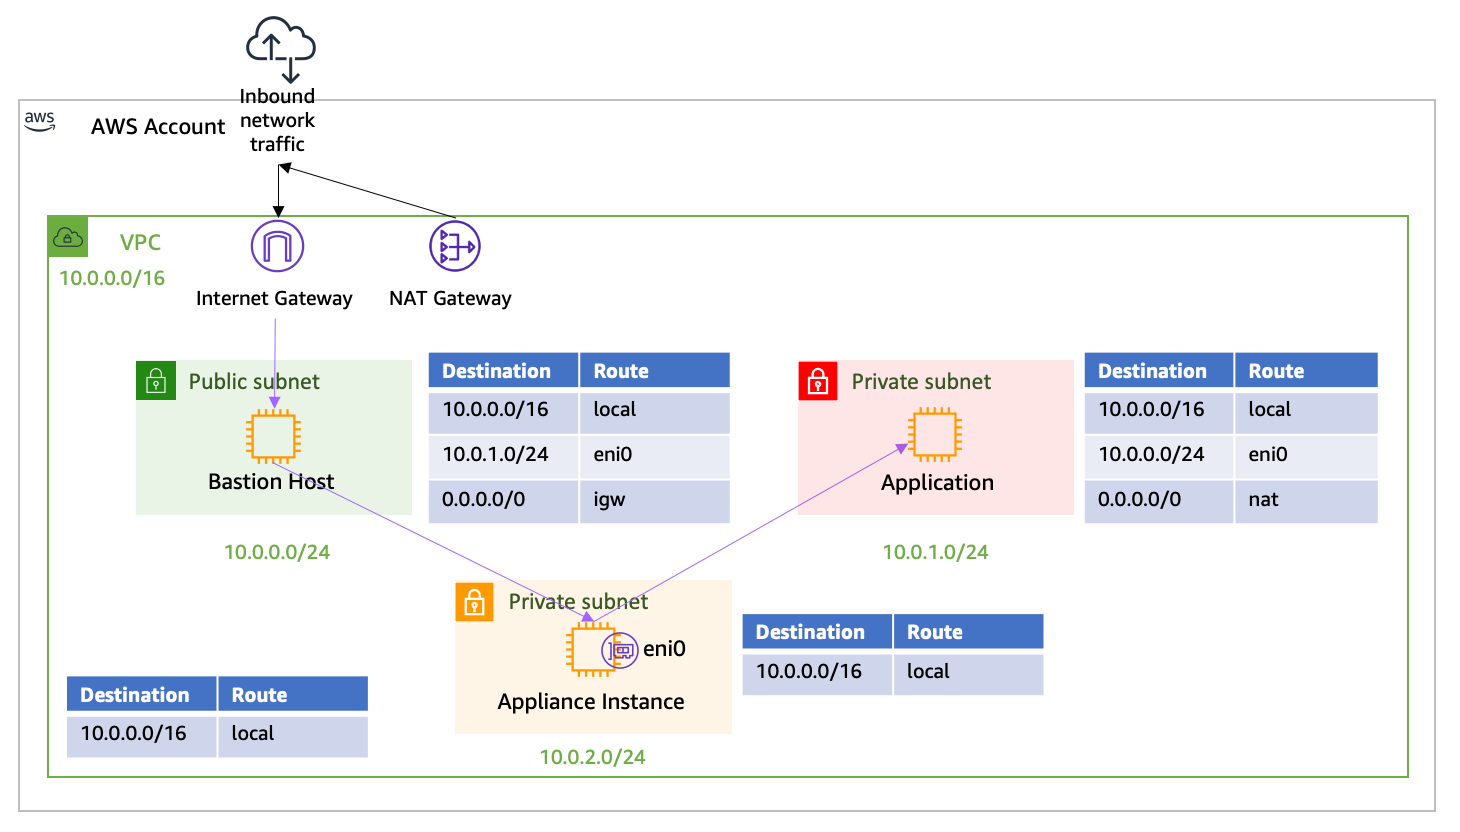
For the purpose of this blog post, let’s assume I have a VPC with three subnets. The first subnet is public and has a bastion host. It requires access to resources, such as an API or a database in the second subnet. The second subnet is private. It hosts the resources required by the bastion. I wrote a simple CDK script to help you to deploy this setup.

For compliance reasons, my company requires that traffic to this private application flows through an intrusion detection system. The CDK script also creates a third subnet, a private one, to host a network appliance. It provides three Amazon Elastic Compute Cloud (Amazon EC2) instances : the bastion host, the application instance and the network analysis appliance. The script also creates a NAT gateway allowing to bootstrap the application instance and to connect to the three instances using AWS Systems Manager Session Manager (SSM).
Because this is a demo, the network appliance is just a regular Amazon Linux EC2 instance configured as an IP router. In real life, you’re most probably going to use either one of the many appliances provided by our partners on the AWS Marketplace, or a Gateway Load Balancer endpoint, or a Network Firewall.
Let’s modify the routing tables to send the traffic through the appliance.
Using either the AWS Management Console, or the AWS Command Line Interface (CLI), I add a more specific route to the 10.0.0.0/24 and 10.0.1.0/24 subnet routing tables. These routes point to eni0, the network interface of the traffic-inspection appliance.
Using the CLI, I first collect the VPC ID, Subnet IDs, routing table IDs, and the ENI ID of the appliance.
VPC_ID=$(aws \ --region $REGION cloudformation describe-stacks \ --stack-name SpecificRoutingDemoStack \ --query "Stacks[].Outputs[?OutputKey=='VPCID'].OutputValue" \ --output text)
echo $VPC_ID APPLICATION_SUBNET_ID=$(aws \ --region $REGION ec2 describe-instances \ --query "Reservations[].Instances[] | [?Tags[?Key=='Name' && Value=='application']].NetworkInterfaces[].SubnetId" \ --output text)
echo $APPLICATION_SUBNET_ID APPLICATION_SUBNET_ROUTE_TABLE=$(aws \ --region $REGION ec2 describe-route-tables \ --query "RouteTables[?VpcId=='${VPC_ID}'] | [?Associations[?SubnetId=='${APPLICATION_SUBNET_ID}']].RouteTableId" \ --output text)
echo $APPLICATION_SUBNET_ROUTE_TABLE APPLIANCE_ENI_ID=$(aws \ --region $REGION ec2 describe-instances \ --query "Reservations[].Instances[] | [?Tags[?Key=='Name' && Value=='appliance']].NetworkInterfaces[].NetworkInterfaceId" \ --output text)
echo $APPLIANCE_ENI_ID BASTION_SUBNET_ID=$(aws \ --region $REGION ec2 describe-instances \ --query "Reservations[].Instances[] | [?Tags[?Key=='Name' && Value=='BastionHost']].NetworkInterfaces[].SubnetId" \ --output text)
echo $BASTION_SUBNET_ID BASTION_SUBNET_ROUTE_TABLE=$(aws \ --region $REGION ec2 describe-route-tables \ --query "RouteTables[?VpcId=='${VPC_ID}'] | [?Associations[?SubnetId=='${BASTION_SUBNET_ID}']].RouteTableId" \ --output text)
echo $BASTION_SUBNET_ROUTE_TABLE
Next, I add two more specific routes. One route sends traffic from the bastion public subnet to the application private subnet through the appliance network interface. The second route is in the opposite direction to route replies. It routes more specific traffic from the application private subnet to the bastion public subnet through the appliance network interface. Confused? Let’s look at the following diagram:
First, let’s modify the bastion routing table:
aws ec2 create-route \ --region $REGION \ --route-table-id $BASTION_SUBNET_ROUTE_TABLE \ --destination-cidr-block 10.0.1.0/24 \ --network-interface-id $APPLIANCE_ENI_IDNext, let’s modify the application routing table:
aws ec2 create-route \ --region $REGION \ --route-table-id $APPLICATION_SUBNET_ROUTE_TABLE \ --destination-cidr-block 10.0.0.0/24 \ --network-interface-id $APPLIANCE_ENI_IDI can also use the Amazon VPC Console to make these modifications. I simply choose the “Bastion” routing tables and from the Routes tab and click Edit routes.
I add a route to send traffic for 10.0.1.0/24 (subnet of the application) to the appliance ENI (eni-055...).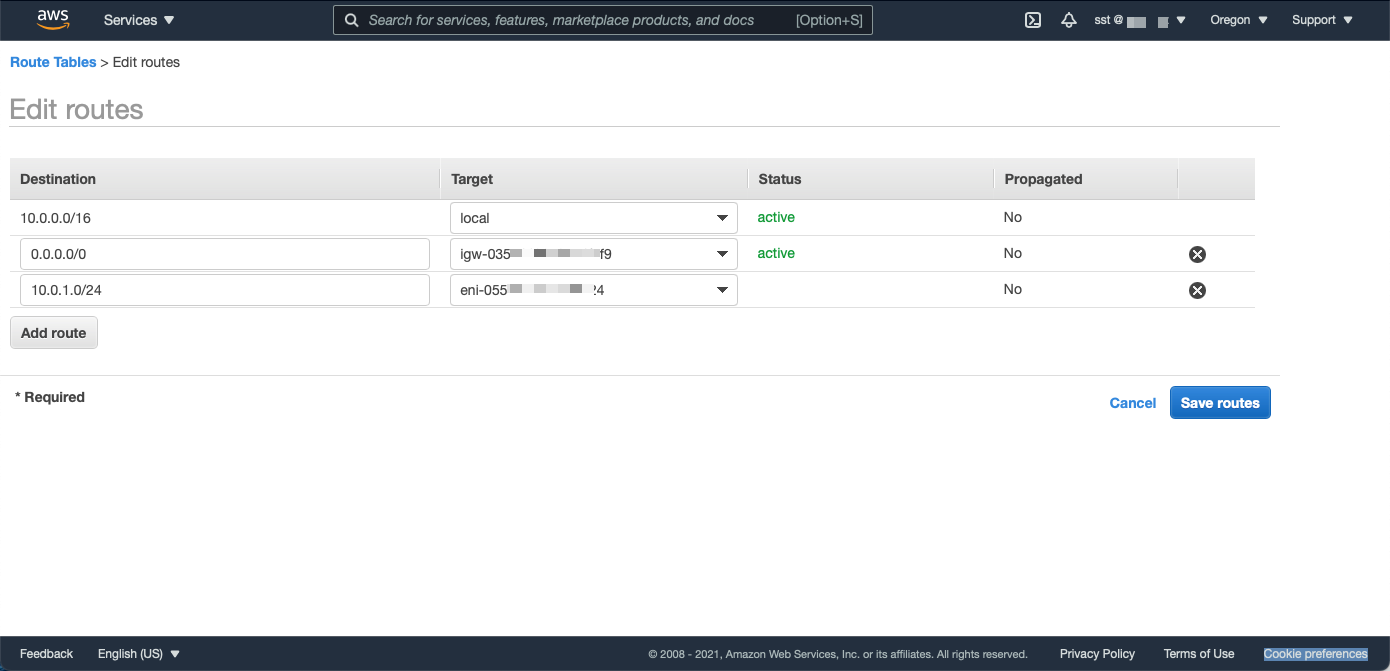
The next step is to define the opposite route for replies, from the application subnet send traffic to 10.0.0.0/24 to the appliance ENI (eni-05...). Once finished, the application subnet routing table should look like this:

Configure the Appliance Instance
Finally, I configure the appliance instance to forward all traffic it receives. Your software appliance usually does that for you. No extra step is required when you use AWS Marketplace appliances or the instance created by the CDK script I provided for this demo. If you’re using a plain Linux instance, complete these two extra steps:
1. Connect to the EC2 appliance instance and configure IP traffic forwarding in the kernel:
sysctl -w net.ipv4.ip_forward=1
sysctl -w net.ipv6.conf.all.forwarding=1
2. Configure the EC2 instance to accept traffic for destinations other than itself (known as source/destination check) :
APPLIANCE_ID=$(aws --region $REGION ec2 describe-instances \ --filter "Name=tag:Name,Values=appliance" \ --query "Reservations[].Instances[?State.Name == 'running'].InstanceId[]" \ --output text) aws ec2 modify-instance-attribute --region $REGION \ --no-source-dest-check \ --instance-id $APPLIANCE_IDTest the Setup
The appliance is now ready to forward traffic to the other EC2 instances.
If you are using the demo setup, there is no SSH key installed on the bastion host. Access is made through AWS Systems Manager Session Manager.
BASTION_ID=$(aws --region $REGION ec2 describe-instances \ --filter "Name=tag:Name,Values=BastionHost" \ --query "Reservations[].Instances[?State.Name == 'running'].InstanceId[]" \ --output text) aws --region $REGION ssm start-session --target $BASTION_IDAfter you’re connected to the bastion host, issue the following cURL command to connect to the application host:
sh-4.2$ curl -I 10.0.1.239 # use the private IP address of your application host
HTTP/1.1 200 OK
Server: nginx/1.18.0
Date: Mon, 24 May 2021 10:00:22 GMT
Content-Type: text/html
Content-Length: 12338
Last-Modified: Mon, 24 May 2021 09:36:49 GMT
Connection: keep-alive
ETag: "60ab73b1-3032"
Accept-Ranges: bytes
To verify the traffic is really flowing through the appliance, you can enable source/destination check on the instance again. Use the --source-dest-check parameter with the modify-instance-attribute CLI command above. The traffic is blocked when the source/destination check is enabled.
I can also connect to the appliance host and inspect traffic with the tcpdump command.
(on your laptop)
APPLIANCE_ID=$(aws --region $REGION ec2 describe-instances \ --filter "Name=tag:Name,Values=appliance" \ --query "Reservations[].Instances[?State.Name == 'running'].InstanceId[]" \ --output text) aws --region $REGION ssm start-session --target $APPLIANCE_ID (on the appliance host)
tcpdump -i eth0 host 10.0.0.16 # the private IP address of the bastion host 08:53:22.760055 IP ip-10-0-0-16.us-west-2.compute.internal.46934 > ip-10-0-1-104.us-west-2.compute.internal.http: Flags [S], seq 1077227105, win 26883, options [mss 8961,sackOK,TS val 1954932042 ecr 0,nop,wscale 6], length 0
08:53:22.760073 IP ip-10-0-0-16.us-west-2.compute.internal.46934 > ip-10-0-1-104.us-west-2.compute.internal.http: Flags [S], seq 1077227105, win 26883, options [mss 8961,sackOK,TS val 1954932042 ecr 0,nop,wscale 6], length 0
08:53:22.760322 IP ip-10-0-1-104.us-west-2.compute.internal.http > ip-10-0-0-16.us-west-2.compute.internal.46934: Flags [S.], seq 4152624111, ack 1077227106, win 26847, options [mss 8961,sackOK,TS val 4094021737 ecr 1954932042,nop,wscale 6], length 0
08:53:22.760329 IP ip-10-0-1-104.us-west-2.compute.internal.http > ip-10-0-0-16.us-west-2.compute.internal.46934: Flags [S.], seq 4152624111, ack 1077227106, win 26847, options [mss
Cleanup
If you used the CDK script I provided for this post, be sure to run cdk destroy when you’re finished so that you’re not billed for the three EC2 instances and the NAT gateway I use for this demo. Running the demo script in us-west-2 costs $0.062 per hour.
Things to Keep in Mind.
There are couple of things to keep in mind when using VPC more specific routes :
- The network interface or service endpoint you are sending the traffic to must be in a dedicated subnet. It cannot be in the source or destination subnet of your traffic.
- You can chain appliances. Each appliance must live in its dedicated subnet.
- Each subnet you’re adding consumes a block of IP addresses. If you’re using IPv4, be conscious of the number of IP addresses consumed (A /24 subnet consumes 256 addresses from your VPC). The smallest CIDR range allowed in a subnet is /28, it just consumes 16 IP addresses.
- The appliance’s security group must have a rule accepting incoming traffic on the desired port. Similarly, the application’s security group must authorize traffic coming from the appliance security group or IP address.
This new capability is available in all AWS Regions, at no additional cost.
You can start using it today.