 |
AWS CloudFormation and the AWS Cloud Development Kit (CDK) provide scalable and consistent provisioning of AWS resources (for example, compute infrastructure, monitoring tools, databases, and more). We’ve heard from many customers that they’d like to benefit from the same consistency and scalability when provisioning resources from AWS Partner Network (APN) members, third-party vendors, and open-source technologies, regardless of whether they are using CloudFormation templates or have adopted the CDK to define their cloud infrastructure.
I’m pleased to announce a new public registry for CloudFormation, providing a searchable collection of extensions – resource types or modules – published by AWS, APN partners, third parties, and the developer community. The registry makes it easy to discover and provision these extensions in your CloudFormation templates and CDK applications in the same manner you use AWS-provided resources. Using extensions, you no longer need to create and maintain custom provisioning logic for resource types from third-party vendors. And, you are able to use a single infrastructure as code tool, CloudFormation, to provision and manage AWS and third-party resources, further simplifying the infrastructure provisioning process (the CDK uses CloudFormation under the hood).
Launch Partners
We’re excited to be joined by over a dozen APN Partners for the launch of the registry, with more than 35 extensions available for you to use today. Blog posts and announcements from the APN Partners who collaborated on this launch, along with AWS Quick Starts, can be found below (some will be added in the next few days).
Registries and Resource Types
In 2019, CloudFormation launched support for private registries. These enabled registration and use of resource providers (Lambda functions) in your account, including providers from AWS and third-party vendors. After you registered a provider you could use resource types, comprised of custom provisioning logic, from the provider in your CloudFormation templates. Resource types were uploaded by providers to an Amazon Simple Storage Service (Amazon S3) bucket, and you used the types by referencing the relevant S3 URL. The public registry provides consistency in the sourcing of resource types and modules, and you no longer need to use a collection of Amazon Simple Storage Service (Amazon S3) buckets.
Third-party resource types in the public registry also integrate with drift detection. After creating a resource from a third-party resource type, CloudFormation will detect changes to the resource from its template configuration, known as configuration drift, just as it would with AWS resources. You can also use AWS Config to manage compliance for third-party resources consumed from the registry. The resource types are automatically tracked as Configuration items when you have configured AWS Config to record them, and used CloudFormation to create, update, and delete them. Whether the resource types you use are third-party or AWS resources, you can view configuration history for them, in addition to being able to write AWS Config rules to verify configuration best practices.
The public registry also supports Type Configuration, enabling you to configure third-party resource types with API keys and OAuth tokens per account and region. Once set, the configuration is stored securely and can be updated. This also provides a centralized way to configure third-party resource types.
Publishing Extensions to the Public Registry
Extension publishers must be verified as AWS Marketplace sellers, or as GitHub or BitBucket users, and extensions are validated against best practices. To publish extensions (resource types or modules) to the registry, you must first register in an AWS Region, using one of the mentioned account types.
After you’ve registered, you next publish your extension to a private registry in the same Region. Then, you need to test that the extension meets publishing requirements. For a resource type extension, this means it must pass all the contract tests defined for the type. Modules are subject to different requirements, and you can find more details in the documentation. With testing complete, you can publish your extension to the public registry for your Region. See the user guide for detailed information on publishing extensions.
Using Extensions in the Public Registry
I decided to try a couple of extensions related to Kubernetes, contributed by AWS Quick Starts, to make configuration changes to a cluster. Personally, I don’t have a great deal of experience with Kubernetes and its API so this was a great chance to examine how extensions could save me significant time and effort. During the process of writing this post I learned from others that using the Kubernetes API (the usual way to achieve the changes I had in mind) would normally involve effort even for those with more experience.
For this example I needed a Kubernetes cluster, so I followed this tutorial to set one up in Amazon Elastic Kubernetes Service (EKS), using the Managed nodes – Linux node type. With my cluster ready, I want to make two configuration changes.
First, I want to add a new namespace to the cluster. A namespace is a partitioning construct that lets me deploy the same set of resources to different namespaces in the same cluster without conflict thanks to the isolation namespaces provide. Second, I want to set up and use Helm, a package manager for Kubernetes. I’ll use Helm to install the kube-state-metrics package from the Prometheus helm-charts repository for gathering cluster metrics. While I can use CloudFormation to provision clusters and compute resources, previously, to perform these two configuration tasks, I’d have had to switch to the API or various bespoke tool chains. With the registry, and these two extensions, I can now do everything using CloudFormation (and of course, as I mentioned earlier, I could also use the extensions with the CDK, which I’ll show later).
Before using an extension, it needs to be activated in my account. While activation is easy to do for single accounts using the console, as we’ll see in a moment, if I were using AWS Organizations and wanted to activate various third-party extensions across my entire organization, or for a specific organization unit (OU), I could achieve this using Service-Managed StackSets in CloudFormation. Using the resource type AWS::CloudFormation::TypeActivation in a template submitted to a Service-Managed StackSet, I can target an entire Organization, or a particular OU, passing the Amazon Resource Name (ARN) identifying the third-party extension to be activated. Activation of extensions is also very easy to achieve (whether using AWS Organizations or not) using the CDK with just a few lines of code, again making use of the aforementioned TypeActivation resource type.
To activate the extensions, I head to the CloudFormation console and click Public extensions from the navigation bar. This takes me to the Registry:Public extensions home page, where I switch to viewing third party resource type extensions.

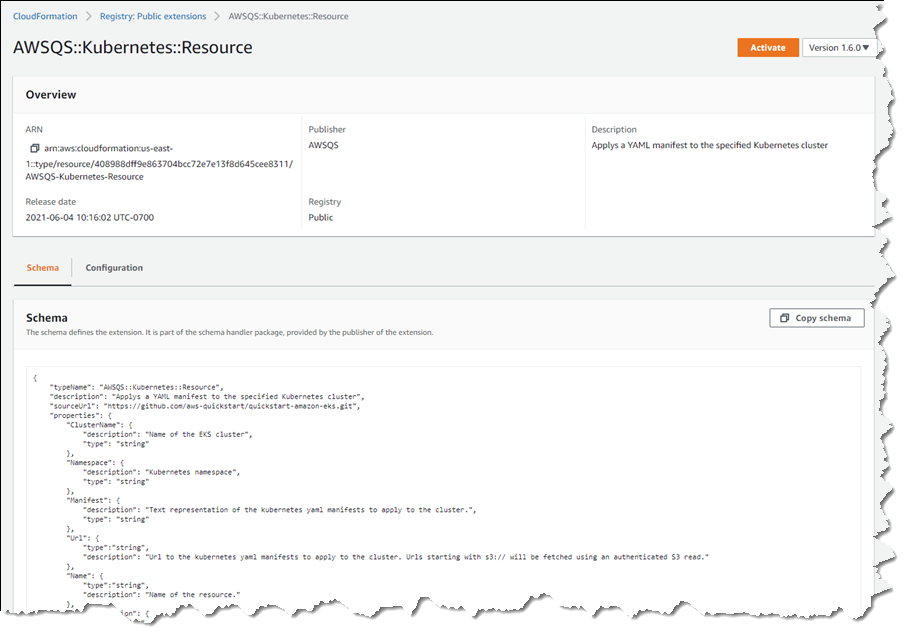
The extensions I want are AWSQS::Kubernetes::Resource and AWSQS::Kubernetes::Helm. The Resource extension is used to apply a manifest describing configuration changes to a cluster. In my case, the manifest requests a namespace be created. Clicking the name of the AWSQS::Kubernetes::Resource extension takes me to a page where I can view schema, configuration details, and versions for the extension.
What happens if you deactivate an extension you’re using, or an extension is withdrawn by the publisher? If you deactivate an extension a stack depends on, any resources created from that extension won’t be affected, but you’ll be unable to perform further stack operations, such as Read, Update, Delete, and List (these will fail until the extension is re-activated). Publishers must request their extensions be withdrawn from the registry (there is no “delete” API). If the request is granted, customers who activated the extension prior to withdrawal can still perform Create/Read/Update/Delete/List operations, using what is effectively a snapshot of the extension in their account.
Clicking Activate takes me to a page where I need to specify the ARN of an execution role that CloudFormation will assume when it runs the code behind the extension. I create a role following this user guide topic, but the basic trust relationship is below for reference.
{ "Version": "2012-10-17", "Statement": [ { "Effect": "Allow", "Principal": { "Service": "resources.cloudformation.amazonaws.com" }, "Action": "sts:AssumeRole" } ]
}
I also add permissions for the resource types I’m using to my execution role. Details on the permissions needed for the types I chose can be found on GitHub, for Helm, and for Kubernetes (note the GitHub examples include the trust relationship too).
When activating an extension, I can elect to use the default name, which is how I will refer to the type in my templates or CDK applications, or I can enter a new name. The name chosen has to be unique within my account, so if I’ve enabled a version of an extension with its default name, and want to enable a different version, I must change the name. Once I’ve filled in the details, and chosen my versioning strategy (extensions use semantic versioning, and I can elect to accept automatic updates for minor version changes, or to “lock” to a specific version) clicking Activate extension completes the process.

That completes the process for the first extension, and I follow the same steps for the AWSQS::Kubernetes::Helm extension. Navigating to Activated extensions I can view a list of all my enabled extensions.

I have one more set of permissions to update. Resource types make calls to the Kubernetes API on my behalf so I need to update the aws-auth ConfigMap for my cluster to reference the execution role I just used, otherwise the calls made by the resource types I’m using will fail. To do this, I run the command kubectl edit cm aws-auth -n kube-system at a command prompt. In the text editor that opens, I update the ConfigMap with a new group referencing my CfnRegistryExtensionExecRole, shown below (if you’re following along, be sure to change the account ID and role name to match yours).
apiVersion: v1
data: mapRoles: | - groups: - system:bootstrappers - system:nodes rolearn: arn:aws:iam::111122223333:role/myAmazonEKSNodeRole username: system:node:{{EC2PrivateDNSName}} - groups: - system:masters rolearn: arn:aws:iam::111122223333:role/CfnRegistryExtensionExecRole username: cfnresourcetypes
kind: ConfigMap
metadata: creationTimestamp: "2021-06-04T20:44:24Z" name: aws-auth namespace: kube-system resourceVersion: "6355" selfLink: /api/v1/namespaces/kube-system/configmaps/aws-auth uid: dc91bfa8-1663-45d0-8954-1e841913b324
Now I’m ready to use the extensions to configure my cluster with a new namespace, Helm, and the kube-state-metrics package. I create a CloudFormation template that uses the extensions, adding parameters for the elements I want to specify when creating a stack: the name of the cluster to update, and the namespace name. The properties for the KubeStateMetrics resource reference the package I want Helm to install.
AWSTemplateFormatVersion: "2010-09-09"
Parameters: ClusterName: Type: String Namespace: Type: String
Resources: KubeStateMetrics: Type: AWSQS::Kubernetes::Helm Properties: ClusterID: !Ref ClusterName Name: kube-state-metrics Namespace: !GetAtt KubeNamespace.Name Repository: https://prometheus-community.github.io/helm-charts Chart: prometheus-community/kube-state-metrics KubeNamespace: Type: AWSQS::Kubernetes::Resource Properties: ClusterName: !Ref ClusterName Namespace: default Manifest: !Sub | apiVersion: v1 kind: Namespace metadata: name: ${Namespace} labels: name: ${Namespace}
On the Stacks page of the CloudFormation console, I click Create stack, upload my template, and then give my stack a name and the values for my declared parameters.

I click Next to proceed through the rest of the wizard, leaving other settings at their default values, and then Create stack to complete the process.
Once stack creation is complete, I verify my changes using the kubectl command line tool. I first check that the new namespace, newsblog-sample-namespace, is present with the command kubectl get namespaces. I then run the kubectl get all --namespace newsblog-sample-namespace command to verify the kube-state-metrics package is installed.

Extensions can also be used with the AWS Cloud Development Kit. To wrap up this exploration of using the new registry, I’ve included an example below of a CDK application snippet in TypeScript that achieves the same effect, using the same extensions, as the YAML template I showed earlier (I could also have written this using any of the languages supported by the CDK – C#, Java, or Python).
import {Stack, Construct, CfnResource} from '@aws-cdk/core';
export class UnoStack extends Stack { constructor(scope: Construct, id: string) { super(scope, id); const clusterName = 'newsblog-cluster'; const namespace = 'newsblog-sample-namespace'; const kubeNamespace = new CfnResource(this, 'KubeNamespace', { type: 'AWSQS::Kubernetes::Resource', properties: { ClusterName: clusterName, Namespace: 'default', Manifest: this.toJsonString({ apiVersion: 'v1', kind: 'Namespace', metadata: { name: namespace, labels: { name: namespace, } }, }), }, }); new CfnResource(this, 'KubeStateMetrics', { type: 'AWSQS::Kubernetes::Helm', properties: { ClusterID: clusterName, Name: 'kube-state-metrics', Namespace: kubeNamespace.getAtt('Name').toString(), Repository: 'https://prometheus-community.github.io/helm-charts', Chart: 'prometheus-community/kube-state-metrics', }, }); }
};
As mentioned earlier in this post, I don’t have much experience with the Kubernetes API, and Kubernetes in general. However, by making use of the resource types in the public registry, in conjunction with CloudFormation, I was able to easily configure my cluster using a familiar environment, without needing to resort to the API or bespoke tool chains.
Get Started with the CloudFormation Public Registry
Pricing for the public registry is the same as for the existing registry and private resource types. There is no additional charge for using native AWS resource types; for third-party resource types you will incur charges based on the number of handler operations (add, delete, list, etc.) you run per month. For details, see the AWS CloudFormation Pricing page. The new public registry is available today in the US East (N. Virginia, Ohio), US West (Oregon, N. California), Canada (Central), Europe (Ireland, Frankfurt, London, Stockholm, Paris, Milan), Asia Pacific (Hong Kong, Mumbai, Osaka, Singapore, Sydney, Seoul, Tokyo), South America (Sao Paulo), Middle East (Bahrain), and Africa (Cape Town) AWS Regions.
For more information, see the AWS CloudFormation User Guide and User Guide for Extension Development, and start publishing or using extensions today!